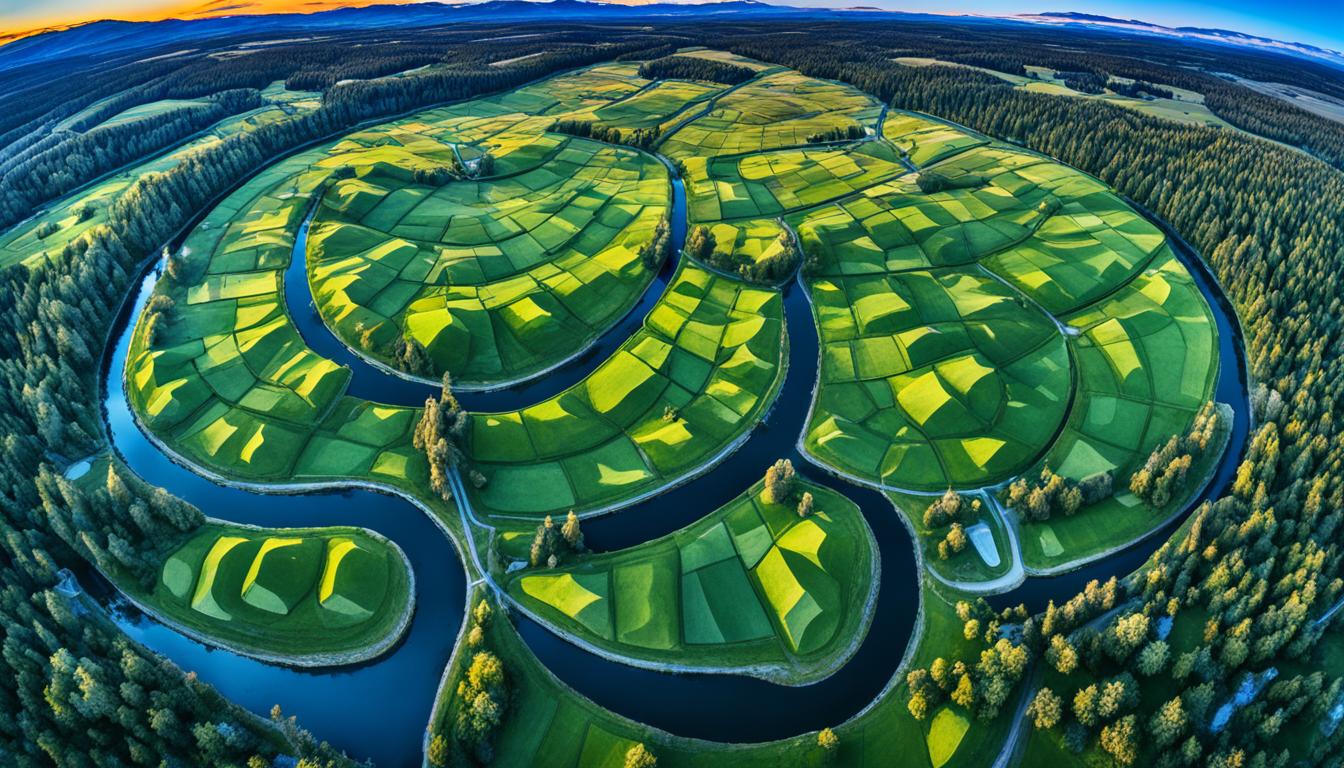
To master panorama blending, combine many aerial photos into one stunning image. This method in aerial photography lets you capture wide views that a single frame can’t. It’s perfect for breathtaking views.
Panoramic photography with drones lets you express your creativity in new ways. By stitching vertical shots together, you can make tall images. These show landscapes, cityscapes, or natural wonders in amazing ways.
To get great results, you need to know drone videography and post-production. Image stitching software is key for blending shots well. With practice, you can capture and combine images that tell a story from above.
We’ll cover the basics of vertical panoramas, from planning to blending. You’ll learn how to overcome challenges and make your images stand out.
Understanding the Basics of Aerial Panoramic Photography
Aerial panoramic photography opens up new dimensions in drone imaging. It lets you capture wide-angle views from unique perspectives. Let’s explore the basics of creating stunning vertical drone panoramas.
What is a panoramic drone shot?
A drone panorama is a series of photos taken from the air and stitched together. These photos form one big image. By using vertical panning, you can make tall, narrow shots. These shots show off towering structures or vast landscapes.
Benefits of vertical panoramas in drone photography
Vertical panoramas are great for capturing tall subjects like skyscrapers or waterfalls. They’re perfect for aerial real estate shots, showing off entire buildings in one shot. These panoramas also give viewers a sense of scale that standard drone photos can’t match.
Essential equipment for aerial panoramic shots
To create stunning vertical panoramas, you’ll need:
- A drone with manual exposure controls
- A reliable remote controller for precise movements
- Software for stitching images seamlessly
- A high-capacity memory card for RAW format shooting
Shooting in manual mode ensures consistent exposure across all images. This makes the blending process smoother. Remember, mastering drone panorama techniques takes practice, but the results are worth it.
Planning Your Vertical Drone Panorama
Planning your drone flight is key to getting amazing vertical panoramas. You need to prepare for aerial photography and think about the best lighting. Here are the main steps to make your drone shots look great.
Selecting the Right Location and Time
Pick places with big views and interesting things to see for your vertical shots. Good spots include cities, mountains, and coasts. The time you fly matters a lot. Early morning or late afternoon gives you the best light, avoiding harsh shadows.
Considering Weather Conditions and Lighting
The weather affects your photos a lot. You want calm days for smooth shots. Overcast skies give soft light, and golden hour sunlight adds warmth. Always check the weather forecast before flying to get the best shots.
| Weather Condition | Effect on Panorama | Best Time to Shoot |
|---|---|---|
| Clear Sky | Sharp contrasts, vivid colors | Golden hour |
| Overcast | Soft, even lighting | Midday |
| Light Fog | Atmospheric depth | Early morning |
Setting Up Your Drone for Optimal Results
Keep your drone at 100-200 feet high for vertical shots. Use grid lines for shots that overlap by 30-40%. Apps like Litchi or DronePan help take consistent panoramas, making your prep easier.
Focus on these drone planning and photography tips to take great vertical shots. Trying different places and times will help you get better at it.
Capturing Techniques for Vertical Panoramas
Learning how to take vertical panoramic shots is key for amazing aerial photos. Begin by setting your drone camera to manual mode for consistent exposure. This makes blending the shots later easier.
When taking vertical panning shots, turn your drone’s camera 45 degrees between each photo. This method ensures a 30-40% overlap, which is vital for smooth stitching. Use your drone’s grid feature to help you move precisely.
For top-notch images, shoot in RAW format. This gives you more flexibility when editing later. After each panorama, snap a photo of the ground. This helps mark the end of each set, making it easier to organize later.
Think about using automated panorama apps for your drone. These apps help control the capture process better, reducing mistakes and ensuring consistent results. They’re great for beginners learning how to take panoramic shots.
Tips for Successful Vertical Panoramas
- Choose a day with stable weather conditions
- Avoid shooting during the middle of the day to prevent harsh shadows
- Use a lower ISO setting to reduce noise in your images
- Set your focus to infinity for sharper overall panoramas
- Practice your vertical panning technique in an open area before attempting complex shots
Mastering these techniques will help you create stunning vertical panoramas. These shots will show the world from a unique view.
Master Panorama Blending for Seamless Vertical Drone Shots
Panorama stitching is key for making stunning vertical drone shots. It lets you create images that show wide vertical landscapes. Let’s dive into panorama blending and learn how to get smooth results.
Understanding Different Blending Methods
Panorama blending uses different methods to combine images into one shot. Spherical projection is great for 360-degree views. Cylindrical projection is best for vertical shots. Perspective projection keeps straight lines, perfect for buildings.
Choosing the Right Software for Panorama Stitching
There are many software options for stitching panoramas, each with its own strengths:
- Adobe Photoshop: Offers powerful tools and flexibility
- PTGui: Provides advanced control over stitching parameters
- Hugin: A free, open-source alternative with robust capabilities
Step-by-Step Guide to Blending Vertical Shots
Here’s how to blend your vertical drone shots:
- Import your images into your chosen software
- Align the photos automatically or manually
- Select the appropriate projection method
- Apply image blending techniques to smooth transitions
- Use boundary warp to minimize cropping
- Fine-tune exposure and color balance
- Export your final panorama
Try different settings and techniques to get the best results. With practice, you’ll make seamless vertical panoramas that highlight your aerial photos.
Post-Processing Tips for Panoramic Drone Images
Mastering post-processing is key to stunning panoramic drone images. Begin by bringing your shots into Adobe Lightroom for initial tweaks. Adjustments here help fix lens distortion and keep edits uniform across all photos.
Color correction is crucial for a smooth blend. Lightroom’s tools let you tweak white balance, exposure, and contrast. For tricky scenes, exposure blending can balance out bright skies with dark ground.
After basic edits, export your images as TIFF files for Photoshop work. Here’s a quick guide to key post-processing steps:
- Import images into Lightroom
- Apply lens corrections
- Sync edits across all images
- Perform color correction
- Export as TIFF files
- Stitch panorama in Photoshop
- Use Puppet Warp to fix distorted horizons
- Remove unwanted elements with Clone Stamp tool
Try different projection methods in Photoshop to get the best panorama. Small tweaks can make a big difference in how natural it looks.
| Software | Key Features | Best For |
|---|---|---|
| Adobe Lightroom | RAW processing, color correction | Initial adjustments, batch editing |
| Adobe Photoshop | Advanced stitching, Puppet Warp | Final panorama assembly, detailed retouching |
| PTGui | Specialized panorama stitching | Complex panoramas, 360-degree images |
Follow these tips to take your panoramic drone images from great to amazing. Remember, practice is key in image editing. Don’t hesitate to try new techniques.
Overcoming Common Challenges in Vertical Panorama Blending
Creating seamless vertical panoramas with drones can be tricky. You’ll face several hurdles, but with the right techniques, you can overcome them. Let’s explore some common issues and their solutions.
Dealing with parallax errors
Parallax errors happen when your drone moves between shots. To fix this, fly in calm weather and use a stable platform. If errors stay, try manual alignment in your editing software.
Correcting exposure differences between shots
Exposure correction is key for a cohesive final image. Shoot in manual mode to keep settings the same across all frames. In post-processing, use gradients or adjustment layers to fix lighting issues.
Handling moving objects in the scene
Moving objects can cause ghosting or blurring. Take several shots of the same area and blend the best parts manually. Use layer masks in your editing software to combine different exposures smoothly.
| Challenge | Solution | Tool/Technique |
|---|---|---|
| Parallax errors | Stable flying, manual alignment | Gimbal stabilization, stitching software |
| Exposure differences | Manual mode shooting, post-processing | Gradients, adjustment layers |
| Moving objects | Multiple shots, manual blending | Layer masks, clone stamp tool |
By tackling these challenges, you’ll boost your vertical panoramas. Remember, practice is key for stitching and reducing motion blur.

Advanced Techniques for Enhancing Vertical Panoramas
Take your drone photos to the next level with advanced techniques. These methods will make your images look amazing. They’ll grab people’s attention and show off your skills.
HDR Panoramas: Expanding Dynamic Range
Make HDR panoramas by taking photos at different exposures. This keeps details in bright and dark areas. Your images will look stunning with more depth and clarity.
Focus Stacking for Incredible Detail
Use focus stacking for close-up shots. This method combines photos taken at various focus points. It makes sure every part of your panorama is clear.
Creative Effects: Tiny Planets
Try making tiny planets with your photos in editing software. This turns your shots into eye-catching, spherical worlds.
Blending Modes and Masking
Use advanced blending modes and masking to mix panoramas or add cool skies. These tools help you make images that look like they’re from another world.
| Technique | Benefits | Difficulty Level |
|---|---|---|
| HDR Panoramas | Improved dynamic range, detailed shadows and highlights | Intermediate |
| Focus Stacking | Enhanced depth of field, sharper details | Advanced |
| Tiny Planets | Unique perspective, creative presentation | Intermediate |
| Blending Modes | Seamless composites, dramatic effects | Advanced |
Master these advanced techniques to open up new creative doors in your drone photos. Try each method to discover your style. Create images that really stand out.
Showcasing Your Vertical Drone Panoramas
Your vertical drone panoramas deserve to be seen in all their glory. Let’s explore ways to display and share your breathtaking aerial shots.
Choosing the Right Display Format
Pick a display format that highlights your panorama’s details. For home or office, consider large canvas wraps or metal prints. These formats bring out the vibrant colors and intricate details of your aerial shots.

Printing Large-Scale Panoramas
Panorama printing offers a way to showcase your work in stunning detail. Look for print shops specializing in large-format prints. They have the equipment to handle the size and resolution of panoramic images. Discuss paper options and finishes to enhance your photo’s impact.
Sharing Your Work Online
Online panorama viewers are perfect for sharing your vertical drone shots digitally. These platforms maintain image quality and allow viewers to explore every inch of your panorama. Some popular options include:
- 500px
- Roundme
- Kuula
For social media sharing, get creative. Instagram’s carousel feature works well for vertical panoramas. You can split your image into multiple posts, encouraging followers to swipe through the entire scene. On Facebook, try 360-degree photos for an immersive experience.
Remember, your vertical drone panoramas tell unique stories. Whether through prints or digital platforms, showcase them in ways that captivate your audience and highlight your aerial photography skills.
Conclusion
Learning how to take vertical drone panoramas can open up new creative doors in aerial photography. By improving your skills in panorama making and drone photography, you can capture wide shots that look amazing. Remember, it’s all about mixing technical skills with your artistic eye.
Getting better at aerial photography takes practice. Try out different methods, from planning your shots to editing them later. As you get better, you’ll make panoramas that show off landscapes and buildings in new ways.
It’s important to be safe and follow the law when using drones for photography. Always make sure you’re following the local rules when taking your aerial photos. With hard work and the right tools, you’ll soon be making professional-quality vertical panoramas that grab people’s attention and tell great stories.


